Contents
AT&T Email Settings For iPhone, Outlook, Windows, iPad & Android
AT&T Webmail, with its excellent features, is an email program powered by Yahoo. One place where you can sign in to your account, is on the my.att.net site. You will first encounter a handy interface greeting you. The official website features local and national news stories, local weather, sports, shopping information, games, chat, and more.
If you are friendly with the Yahoo Mail page, you will feel right at home on the AT&T Webmail page as well. The layout is a little bit different, and the background is likely AT&T orange. For its outstanding qualities and features, AT&T users have reviewed it to be one of the best email providers. However, there are a few issues that occur during the AT&T Email Settings. There are AT&T Email Login Problems, which usually occur when the AT&T server is down. Sometimes the server goes down, and the AT&T Email Server Settings also show an error on the screen. These issues are not very hard to fix. One of the easiest ways is to check if the server is down or not is to visit the websites where you will get to know the status of the AT&T server.
Here, we will discuss the step-by-step process and method to set up the AT&T email and its setting on platforms like Outlook, Windows, Mac, iPhone, Android, iPad, etc.
Advantages of AT&T Webmail
While there are multiple advantages of At&T webmail, below-listed are the most significant ones:
- Accessibility: It can be used anytime, anywhere, using any device connected to the internet.
- Configuration: There are usually none. You can go to www.att.net and click the Mail icon.
- Reliability: Messages are safely stored online, so they will be there when you need them.
- Storage: All your emails are stored online.
- Spam: It is convenient to access your spam folder to check messages.
- AT&T email features for people with disabilities: AT&T provides email facilities and unique features for people with disabilities. Features like Window-eyes version 7.2 (or higher) and Read Aloud- a Text to Speech Voice Reader and Chrome surely helps people and makes it easier for them to use the email account.
AT&T Email Server settings
Many of you may not know the correct AT&T Email Outlook Settings, and there is nothing wrong with that. We all have to learn the process that we are doing for the first time. Below mentioned steps will surely help you know the exact ATT email settings and set up your account successfully on different devices and email clients.
The steps are straightforward; anyone can follow and execute them. You don’t’ need technical expertise. Just keep following the instructions carefully, and your ATT Net Email Settings for Outlook will be configured successfully within a few minutes.
ATT IMAP Email Settings
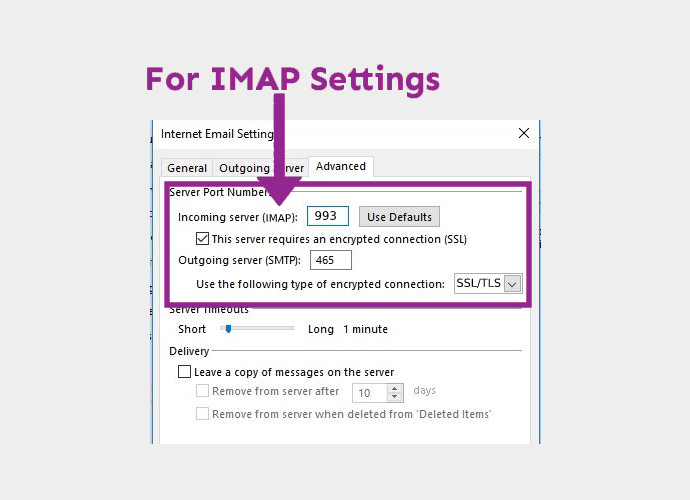
You need to apply these settings in order to use the incoming email services without any problem:
- First of all, you need to make sure your account type is IMAP. For username, enter your ATT email address and then the password.
For the incoming server, the hostname should be imap.mail.att.
- The server port value should be 993 and for authentication, enter your username and password. Put yes, for SSL/TLS.
After applying ATT email IMAP settings, you will be able to enjoy the ATT incoming mail services.
Settings for ATT Email SMTP
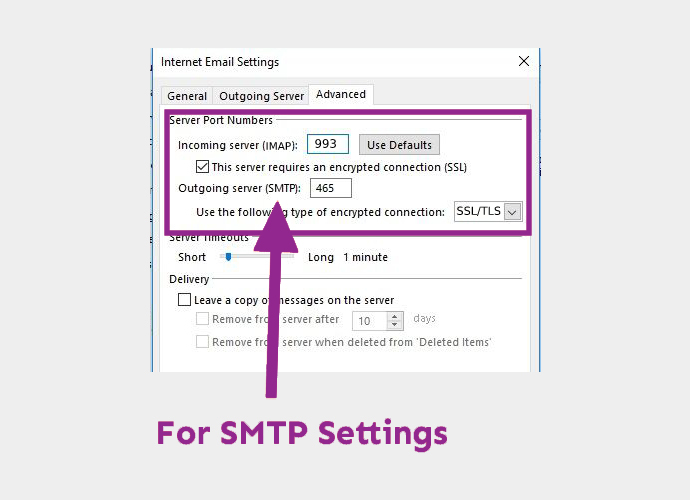
Follow the below-mentioned steps to apply the required Outgoing (SMTP) server setting for ATT:
- Make sure your account type is SMTP. For username, use your email address and your ATT password.
- The server hostname should be smtp.mail.att.net, and the server port value should be 465. Use your email address and password for authentication. Put YES when prompted for SSL/TLS.
Once you apply the att.net email SMTP settings, you get the freedom to use att outgoing email services without any issue.
ATT.NET Email POP3 Server Settings
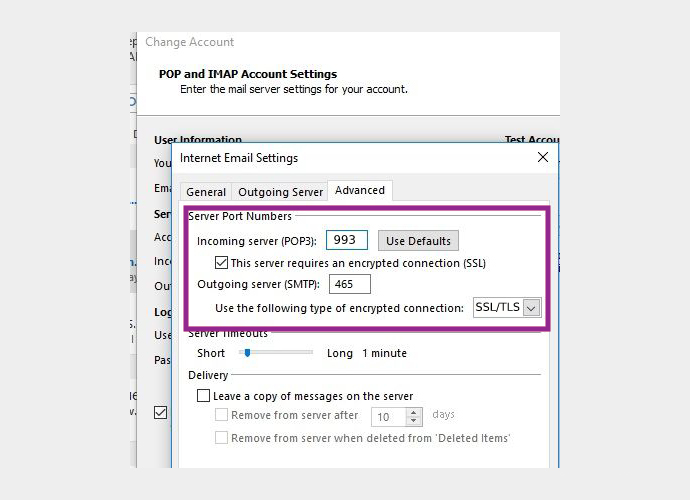
Find below the ATT POP email settings for ATT email that you need to apply for being able to use the ATT email services on your device or email client –
If you choose to go with the POP3 Settings, then enter the incoming server settings mentioned below:
- Make sure the ATT POP3 incoming mail server shows inbound.att.net and the server value is 995.
For POP3 SMTP Outgoing Mail Server information, enter the following details:
- Ensure that the outgoing mail server reflects ‘outbound.att.net’ and the port value is 465.
- Make sure to mark the ‘requires authentication’ box.
The settings mentioned above are used when you automatically set up the email account. The settings will work successfully.
ATT Email Settings for Outlook
You will find below the ATT Yahoo Email Server Settings. The settings are tested and you can just follow the instructions to successfully configure your account.
ATT.Net Email and Yahoo users would surely appreciate the idea of accessing important emails or send reply even when they are on the go. Configuration or settings of ATT.Net Yahoo Email on Outlook helps you in quick access to emails wherever you are.
You can follow this step-by-step guideline to sync ATT.Net Yahoo email accounts on Outlook.
ATT Email Settings for Outlook 2007
If you are using Outlook 2007 and want to set up an AT&T mail account for it, here are the steps to perform if you are setting up your email for the first time or on a new device. Make sure to use the correct ATT Email Setting for Outlook 2007 to configure your account properly.
- First, you need to open your Outlook, and from the menu bar, select Tools, and then click on Account Settings. Click on New, and an Add New Email Account dialogue box will appear where you have to select the checkbox for Manually configure server settings or additional server types and now click on Next.
- Choose for Internet Email option to connect to your POP, IMAP, or HTTP and click on Next. Now you have to enter the details in the required field. Now, after filling in the details, check the box for Required logon using Secure Password Authentication (SPA)and click on More Settings.
- Now, click on the ‘Outgoing Server tab’ and then check the box for My Outgoing Server (SMTP) requires authentication. After that, select the option. Use the same settings as ‘my incoming mail server’. Now, click on the Advanced tab and enter the required information.
- Finally, click on OK, Next, and then click on Finish. You have successfully set up your AT&T Account.
AT&T Email Settings for Outlook 2010
The steps are given below that will help you in the automatic setup of your ATT Email Account on Outlook 2010:
- First, you need to click on the outlook link and open the web page. Go through the new options and select the file. Now, click on the information and account settings.
- After that, you will see Auto Account Set-Up and will get a few warning messages on the account set up. Move ahead and click ‘allow,’ then choose ‘yes’ below.
- Microsoft Outlook 2010 automatically configures your account as an IMAP account with all the correct settings. Move ahead and click ‘yes.’
The settings for the automatic update for Outlook 2010 have been made, and now you can enjoy the AT&T Email services on Outlook 2010.
ATT Email Settings for Outlook 2013
Following are the steps given for automatic settings that can be followed by anyone as the process is simple and short.
- Launch the Outlook webpage and click on Files. Now, Click on Info and Account Settings. A screen would pop up and requires filling in the details for the Auto set up. Now you need to click on Next.
- Click on Allow and choose Yes. Your Outlook will now auto-connect with the IMAP account with all the connection settings. Click on finish and then choose OK.
ATT Email Settings for Outlook 2016 and 2019
For ATT Email Settings for Outlook 2016 and ATT email settings for outlook 2019, you need to follow the steps mentioned below:
- Open the outlook website and sign up for the new account. Go towards the left side and tab and then select the top of the web page’s bar. Now you can click on the info and account settings now.
- Click on Add Accountand then type in your email address. It will automatically select IMAP as your updates settings. Now you need to click on Connect and then Finish and Your Auto-Setup for MS Outlook 2016 has been done successfully, and you can go through step by step procedure for complete setup updating.
AT&T Email Settings for Windows, iPhone, iPad & Android –
You can access your AT&T email services online using the webmail option, but it will often be more convenient to use an email client. Windows as an email client go perfectly for AT&T email accounts. Here we are going to give you the methods and instructions to follow to set up your AT&T email account on Windows, Mac, iPhone, iPad, and Android.
Windows ATT Email Settings
Below are the given steps to follow to set up your AT&T email account on windows:
- Click in windows mail ‘tools’ and then ‘accounts’ and then ‘add.’ ‘Email’ option is automatically selected, so click ‘Next.’ Now you need to enter your details like email address and click Next. Now, select POP3 in the drop-down menu and set the address to pop.att.yahoo.com. In the SMTP box, put the address to smtp.att.yahoo.com. Now, Click on the outgoing server requires authentication and click Next.
- Enter your email, login, and password. Now, click Next > Finish > Properties > Advanced. Now, set the Outgoing port to 465 and then the incoming port to 995. Click Ok and then Close.
ATT NET Email Settings for iPhone & iPad
Find the steps below for your AT&T Email Settings iPhone and AT&T Email Settings iPad :
- You need to first go to the settings icon on your homepage and then select email. Now, select the Account >Add Account > Other > Add email Account. Now, you need to enter your necessary details, including Name, Email, and then Next. Now select IMAP, scroll down to incoming mail server, and fill in all the required details. Click Next. You will see “cannot verify server identify,” click on Continue and Save. Select your new account, and then the SMTP server.
Once you through all the steps mentioned above, your ATT Email Settings for iPhone will successfully be completed.
ATT Email Settings for Android
Follow the steps mentioned below for your ATT Email Settings for Android:
- First of all, click on the option of Manual Setup. Now, choose IMAP account and enter the details as – IMAP Server: imap.mail.att.net, Security Type: None, Port: 993 for IMAP, Secure Port: SSL/TLS, Incoming Port: 143, Security Type: None.
- Enter the following for outgoing SMTP settings – Secured Port: 465, Secure Type: SSL/TLS, Secured Port: 587, Incoming Port: 587, Secure Type: None.
AT&T Email Not Working issues can happen because of improper AT&T Email Server settings or AT&T email down. Hence, it is vital to check and update the AT&T email server settings for both the incoming and outgoing mail servers.
In this blog, we figured out various steps to configure and use the ATT Email Account Settings on Outlook, Windows, iPhone, iPad and Android. We also explained the easy process to ATT Net Email Server settings which can later help you to set up your accounts without any technical assistance. We hope this blog was helpful to you.